Generic settings
SSID: 37C3

EAP-TTLS:

Phase 1: EAP-TTLS
Phase 2: PAP

PEAP:

Phase 1: PEAP
Phase 2: MSCHAPv2 or EAP-MSCHAPv2 or PAP

CN = radius.c3noc.net
CA = ISRG Root X1

SHA256 Fingerprint = 35:5D:99:3D:74:8A:80:48:0C:AC:A3:19:54:48:26:29:F1:FD:95:2A:14:AC:D6:52:83:5B:DE:6B:B9:E4:01:78
Make sure you check the certificate in order to know you are connecting to the correct network (you should check on both the CN and the CA).
Android
You can use our Android app to automatically configure the most secure WiFi settings on your Android device:
This app installs the certificate and WiFi profile which will allow your device to automatically connect. You can do it manually, as shown below, but it’s a bit more hassle.
Manual configuration
If you don’t want to use the app, download the ISRG Root X1 certificate, and install it into your device’s Wi-Fi certificate store, giving it any name you like. Then connect to the 37C3 network using the following information:
- EAP method: TTLS (not TLS)
- CA certificate: (whatever name you gave the ISRG Root X1)
- Domain: radius.c3noc.net
- Identity: 37C3
- Password: 37C3
It’s fine to leave Online Certificate status as “Do not validate”, and leave the Anonymous identity blank.
Linux, etc.
Network Manager
You can use the following config file:
Please note that some versions of NM are buggy and will only work with 802.1X using MSCHAPv2, or not at all. If that affects you, it may be easiest to use wpa_supplicant.
/etc/NetworkManager/system-connections/37C3:
Hint: chmod 600 this file to make the connection work.
[connection]
id=37C3
uuid=c80101e2-7b99-4511-846b-2388eb86a5ad
type=wifi

[wifi]
mode=infrastructure
ssid=37C3

[wifi-security]
auth-alg=open
key-mgmt=wpa-eap

[802-1x]
altsubject-matches=DNS:radius.c3noc.net
ca-cert=/etc/ssl/certs/ISRG_Root_X1.pem
eap=ttls;
identity=37C3
password=37C3
phase2-auth=pap

[ipv4]
method=auto

[ipv6]
method=auto
Network Manager via GNOME (graphical)
Similarly, you can also configure the WiFi through NetworkManager's graphical user interface.
As for the certificate, it is usually preinstalled nowadays and in most distributions can be found in /etc/ssl/certs (file name: ISRG_Root_X1.pem). You need to select that manually.
Otherwise, this is the configuration (the example shows the outboundonly username, as explained above, you can use any):
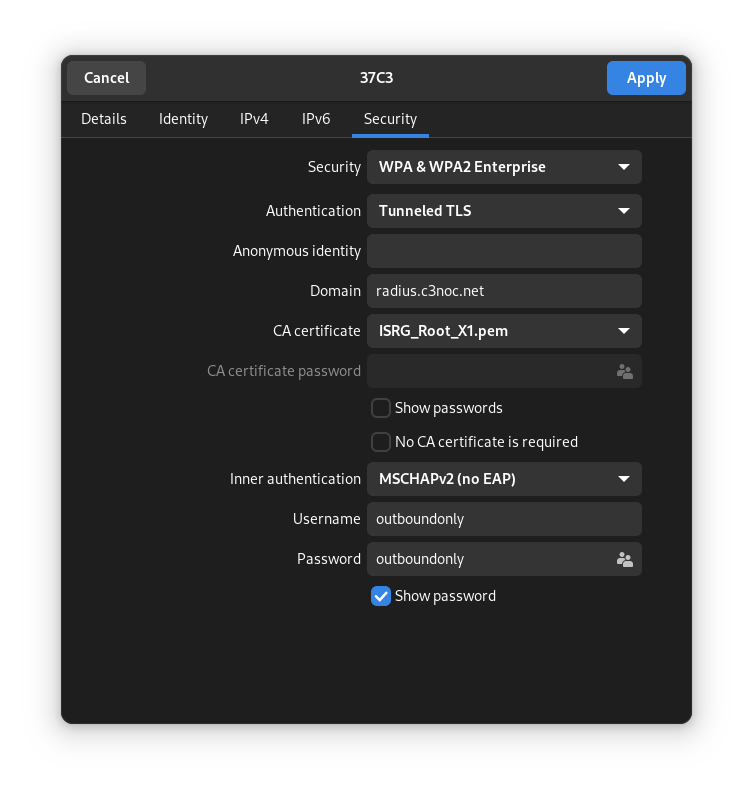
Security: WPA & WPA2 Enterprise
Authentication: Tunneled TLS
Anonymous identity: empty
Domain: radius.c3noc.net
CA certificate: ISRG_Root_X1.pem
CA certificate password disabled
“Show password” and “No CA certificate is required” unchecked
Inner authentication: MSCHAPv2 (no EAP)
Username: outboundonly
Password: outboundonly
WiCD
You need an additional crypto setting for WiCD. Put this file into /etc/wicd/encryption/templates/eap-ttls (debian systems, might be different with other *nix flavours):
 name = EAP-TTLS 37C3
 author = Felicitus
 require identity *Identity password *password
 -----
 ctrl_interface=/var/run/wpa_supplicant
 network={
  ssid="37C3"
  scan_ssid=$_SCAN
  identity="37C3"
  password="37C3"
  proto=WPA2
  key_mgmt=WPA-EAP
  group=CCMP
  pairwise=CCMP
  eap=TTLS
  ca_cert="/etc/ssl/certs/ISRG_Root_X1.pem"
  altsubject_match="DNS:radius.c3noc.net"
  anonymous_identity="$_ANONYMOUS_IDENTITY"
  phase2="auth=PAP"
  #priority=2
 }
Edit /etc/wicd/encryption/templates/active to include the eap-ttls config template. Restart the WiCD daemon, choose the proper encryption (EAP-TTLS 37C3) and enter a random username/password.
Jolla/connman
/var/lib/connman/37C3wifi.config :
 [service_37C3]
 Type=wifi
 Name=37C3
 EAP=ttls
 Phase2=PAP
 Identity=37C3
 Passphrase=37C3
wpa_supplicant
This is the default option on Raspberry Pi OS. Edit /etc/wpa_supplicant/wpa_supplicant.conf and add the network:
 network={
    ssid="37C3"
    key_mgmt=WPA-EAP
    eap=TTLS
    identity="37C3"
    password="37C3"
    # ca path on debian 7.x and raspberry pi OS, modify accordingly
    ca_cert="/etc/ssl/certs/ISRG_Root_X1.pem"
    altsubject_match="DNS:radius.c3noc.net"
    phase2="auth=PAP"
 }
Interfaces
As an alternative, you can specify the wpa_supplicant config options directly in /etc/network/interfaces:
 iface wlan0 inet dhcp
    wpa-ssid 37C3
    wpa-identity 37C3
    wpa-password 37C3
    wpa-proto WPA2
    wpa-key_mgmt WPA-EAP
    wpa-group CCMP
    wpa-pairwise CCMP
    wpa-eap TTLS
    wpa-phase2 "auth=PAP"
    wpa-ca_cert "/etc/ssl/certs/ISRG_Root_X1.pem"
    wpa-altsubject_match DNS:radius.c3noc.net
Netctl
Description='37C3 secure WPA2 802.1X config'
Interface=wls1
Connection=wireless
Security=wpa-configsection
IP=dhcp
ESSID=37C3
WPAConfigSection=(
    'ssid="37C3"'
    'proto=RSN WPA'
    'key_mgmt=WPA-EAP'
    'eap=TTLS'
    'identity="37C3"'
    'password="37C3"'
    'ca_cert="/etc/ssl/certs/ISRG_Root_X1.pem"'
    'altsubject_match="DNS:radius.c3noc.net"'
    'phase2="auth=PAP"'
)
IWD
[Security]
EAP-Method=PEAP
EAP-Identity=anonymous@37C3
EAP-PEAP-CACert=/etc/ssl/certs/ISRG_Root_X1.pem
EAP-PEAP-ServerDomainMask=radius.c3noc.net
EAP-PEAP-Phase2-Method=MSCHAPV2
EAP-PEAP-Phase2-Identity=37C3
EAP-PEAP-Phase2-Password=37C3

[Settings]
AutoConnect=true
NixOS
NetworkManager
make sure to change the interface-name accordingly
networking.networkmanager.ensureProfiles.profiles = {
  "37C3" = {
    connection = {
      id = "37C3";
      type = "wifi";
      interface-name = "wlan0";
    };
    wifi = {
      mode = "infrastructure";
      ssid = "37C3";
    };
    wifi-security = {
      auth-alg = "open";
      key-mgmt = "wpa-eap";
    };
    "802-1x" = {
      anonymous-identity = "37C3";
      eap = "ttls;";
      identity = "37C3";
      password = "37C3";
      phase2-auth = "pap";
      altsubject-matches = "DNS:radius.c3noc.net";
      ca-cert = "${builtins.fetchurl {
        url = "https://letsencrypt.org/certs/isrgrootx1.pem";
        sha256 = "sha256:1la36n2f31j9s03v847ig6ny9lr875q3g7smnq33dcsmf2i5gd92";
      }}";
    };
    ipv4 = {
      method = "auto";
    };
    ipv6 = {
      addr-gen-mode = "default";
      method = "auto";
    };
  };
};
wpa_supplicant
networking.wireless.networks."37C3".auth = ''
  key_mgmt=WPA-EAP
  eap=TTLS
  identity="37C3"
  password="37C3"
  ca_cert="${builtins.fetchurl {
    url = "https://letsencrypt.org/certs/isrgrootx1.pem";
    sha256 = "sha256:1la36n2f31j9s03v847ig6ny9lr875q3g7smnq33dcsmf2i5gd92";
  }}"
  altsubject_match="DNS:radius.c3noc.net"
  phase2="auth=PAP"
'';
Apple macOS
To enable the most secure WiFi configuration on macOS:
- Download this mobileconfig file and double-click on it. You’ll get an unhelpful notification.
- Open Settings and search for the “Profiles” pane.
- Click the “+” button and select the mobileconfig file.
- After you’ve finished the install, your computer should automatically connect to the 37C3 WiFi.
Apple iOS
To enable the most secure WiFi configuration on iOS, open this mobileconfig file in Safari. After the file is installed, your device should automatically connect to the 37C3 WiFi.
Windows
Windows users (and other clients using MSCHAPv2) should use a fixed username and password. You can use “37C3/37C3” or “guest/guest” as username/password.
Import one of these profiles for the most secure WiFi settings for Windows:
- 37C3 (2.4GHz+5GHz)
To import and connect follow these steps:
- Open a command prompt and execute: netsh wlan add profile filename=37C3.xml
- Connect to the 37C3 network; use “37C3/37C3” as the username/password when prompted. Alternatively, use “outboundonly/outboundonly” as the username/password to enable inbound traffic firewalling.